Friday, October 14, 2011

Microsoft Excel 2007 Tutorial

Lesson 1: Entering Text and Numbers
Microsoft Excel is an electronic spreadsheet that runs on a personal computer. You can use it to organize your data into rows and columns. You can also use it to perform mathematical calculations quickly. This tutorial teaches Microsoft Excel basics. Although knowledge of how to navigate in a Windows environment is helpful, this tutorial was created for the computer novice. This lesson will introduce you to the Excel window. You use the window to interact with Excel.
  • The Microsoft Excel Window
  • The Microsoft Office Button
  • The Quick Access Toolbar
  • The Title Bar
  • The Ribbon
  • Worksheets
  • The Formula Bar
  • The Status Bar
  • Move Around a Worksheet
  • Go To Cells Quickly
  • Select Cells
  • Enter Data
  • Edit a Cell
  • Wrap Text
  • Delete a Cell Entry
  • Save a File
  • Close Excel
Lesson 2: Entering Excel Formulas and Formatting Data
Lesson 1 familiarized you with the Excel 2007 window, taught you how to move around the window, and how to enter data. A major strength of Excel is that you can perform mathematical calculations and format your data. In this lesson, you learn how to perform basic mathematical calculations and how to format text and numerical data.
  • Set the Enter Key Direction
  • Perform Mathematical Calculations
  • AutoSum
  • Perform Automatic Calculations
  • Align Cell Entries
  • Perform Advanced Mathematical Calculations
  • Copy, Cut, Paste, and Cell Addressing
  • Insert and Delete Columns and Rows
  • Create Borders
  • Merge and Center
  • Add Background Color
  • Change the Font, Font Size, and Font Color
  • Move to a New Worksheet
  • Bold, Italicize, and Underline
  • Work with Long Text
  • Change a Column's Width
  • Format Numbers

Lesson 3: Creating Excel Functions, Filling Cells, and Printing
By using functions, you can quickly and easily make many useful calculations, such as finding an average, the highest number, the lowest number, and a count of the number of items in a list. Microsoft Excel has many functions you can use. You can also use Microsoft Excel to fill cells automatically with a series.For example, you can have Excel automatically fill your worksheet with days of the week, months of the year, years, or other types of series.
A header is text that appears at the top of every page of your printed worksheet. A footer is text that appears at the bottom of every page of your printed worksheet. You can use a header or footer to display among other things titles, page numbers, or logos. Once you have completed your Excel worksheet, you may want to print it. This lesson teaches you how to use functions, how to create a series, how to create headers and footers, and how to print.
  • Using Reference Operators
  • Understanding Functions
  • Fill Cells Automatically
  • Create Headers and Footers
  • Set Print Options
  • Print

Lesson 4: Creating Charts
In Microsoft Excel, you can represent numbers in a chart. On the Insert tab, you can choose from a variety of chart types, including column, line, pie, bar, area, and scatter. The basic procedure for creating a chart is the same no matter what type of chart you choose. As you change your data, your chart will automatically Update. This lesson teaches you how to create a chart in Excel.
  • Create a Chart
  • Apply a Chart Layout
  • Add Labels
  • Switch Data
  • Change the Style of a Chart
  • Change the Size and Position of a Chart
  • Move A Chart to a Chart Sheet
  • Change the Chart Type
BY SETTU

Thursday, October 13, 2011

மனிதன் காலடித்தடம் பதிக்காக 10 இடங்கள்!! –

மனித தொழில்நுட்பம் உலகம் மற்றும் வான்வெளியில் உள்ள அனைத்தையும் ஊடுருவிச் செல்ல உதவினாலும். மனிதன் இன்னமும் தன் காலடித்தடம் பதிக்காத இடங்கள் இருக்கிறது! – (The Unexplored Area)
அதில் முக்கிய பத்து (10) இடங்களை இங்கே பட்டியலிட்டுள்ளோம்.

1. Northwest Siberia – வடமேற்கு சைபீரியா
Northwest-Siberia

2. Caves – குகைகள்
இன்றும் பல குகைகள் உலகில் கண்டறியப்படவில்லை, இதன் காரணம் அதில நிறைந்த பல மர்மங்கள், பல அச்சுறுத்தும் நிகழ்வுகள் நடக்கக்கூடும் என்பதால் மனிதன் இன்னும் தயங்குகிறான்.
Caves

3. Amazon Rain-forest – அமேசான் மழை காடுகள்!
Amazon-Rainforest

4. Antarctica – அன்டார்டிகா
Antarctica

5. Mariana Trench & Deep Sea Ocean – மரியானா அகழி & ஆழ்கடல்கள்!
Mariana-Trench-Deep-Sea-Ocean

6. Deserts – பாலைவனங்கள்!
Deserts

7. Gangkhar Puensum, Bhutan – கங்க்கார் பியுன்சும் – புட்டான்
Gangkhar-Puensum-Bhutan

8.Icecap; Greenland – உறைபனிக்கட்டி, கிரீன்லாந்து
Icecap-Greenland

9. Mountains of Northern Columbia – வட கொலம்பியாவின் மலைகள்
Mountains-of-Northern-Columbia

10. Central Range, New Guinea – புது குனியா மழை தொடர்கள்
Central-Range-New-Guinea

Windows Remote Access

The LRC has a Citrix Terminal Server which allows you to access your LRC Windows desktop remotely from various clients such as Windows 95/98/NT/2000/XP, MacOS 8/9/X, Linux, and other Unix flavors. The Terminal Server provides access to applications available in the LRC that students might not have on their home or office systems. Available applications are:
ABAQUS
MATLAB
NASTRAN
Adobe Acrobat
Mathematica
SolidWorks
Adobe Illustrator
MS Office
Tecplot
Adobe Photoshop
MS Project
Tk Solver
Fluent & Gambit
MS Visio
X-Win32
Logging into the Terminal Server is the same as logging into a PC in the LRC. Connecting to the Terminal Server from a Windows or Mac client, your local hard drive will automatically be mapped allowing you to copy files between the Terminal Server session and your local system.
To get started using the Terminal Server follow the steps below.

Windows Setup
1. Download and run the ICA client installer.
2. You only need to install the Program Neighborhood and can select the defaults during the rest of the installation.
3. Open the Citrix Program Neighborhood and choose Add ICA Connection. If you do not see the Add ICA Connection icon, select the Up icon to get the Custom ICA Connection icon.
3a. Choose Local Area Network
3b. Enter a description and choose TCP/IP + HTTP. Then click the Server Location... button.
3c. Uncheck the Use Default box and select the Add button. Enter 146.6.104.73.
3d. Select Published Application and enter Desktop.
3e. Select View in a remote desktop window.
3f. Uncheck Use Default and select Encryption Level: 128 Bit.
3g. Leave User name and Domain blank.
3h. Uncheck Use Default buttons and select Windows Colors: High Color and Window Size: Full Screen.

4. When finished, the Citrix Program Neighborhood should look like the image below. To start the Terminal Server session, double click the LRC Terminal Server icon.
To enable sound select the Settings icon and go to the Default Options tab.
6. If you want to modify your configuration or if it not working correctly, select the LRC Citrix1 Desktopicon and then select the Properties icon.
   

Mac Setup
1. Run the ICA client installer.
2. Select the defaults during the installation.
3. Open the Citrix Client Editor and configure using the following settings:


4. Select the Save button and save as LRC Citrix1 Desktop
5. To start the Terminal Server session click the Connect button

Linux and Unix Setup
If running Red Hat Linux, download the RPM version of the ICA client. To install the RPM use the command rpm -Uvh ica-client.rpm, where ica-client is name of the client file.
To install the other Linux/Unix clients, the client install file must be uncompressed and untarred before installing. Use the commands where ica.tar is the name of the client install file.
  • gzip -d ica.tar.gz
  • tar -xvf tca.tar
The default install location is /usr/lib/ICAClient. See the Unix Client Admin Guide if you are interested in changing the default install location. These instructions use the default location.
1. Start Citrix ICA Client Editor with the command /usr/lib/ICAClient/wfcmgr

2. Select New... from the Entry menu and configure using the following settings.
  • Server Description: LRC Citrix1 Desktop
  • Server: 146.6.104.73
  • Encryption Level: RC5 (128 bit)
  • Windows Colors: 32 Thousand or better
  • Window Size: Fixed size with resolution of 1024 X 768 or better
3. Click OK and the Client Editor should look like below. To start the Terminal Server session click the lightning bolt icon.

Wednesday, October 12, 2011

பிரார்த்தனை என்பது அல்லாஹ் ஒருவனிடம் மட்டுமே!

நான் உங்களை விட்டும், அல்லாஹ்வையன்றி நீங்கள் பிரார்த்திப்பவற்றை விட்டும் விலகிக் கொள்கிறேன். மேலும் நான் என் இறைவனை பிரார்த்தித்துக் கொண்டே இருப்பேன். என் இறைவனைப் பிரார்த்திப்பது கொண்டு நான் நிர்ப்பாக்கியவனாகாமல் இருக்கப் போதும்" (என்று இப்றாஹீம் சொன்னார்). (அல்குர்ஆன்: 19:48)

Wednesday, October 5, 2011

MS-EXCEL 2010-ல் Background செட் செய்வது எப்படி?

அலுவலக மற்றும் வீட்டு பயன்பாட்டிற்க்காக பலராலும் பயன்படுதப்படும் ஆப்பிஸ் தொகுப்பு MS-OFFICE ஆகும். Microsoft நிறுவனத்தின புதிய வெளியிடான 2010 ல் எக்சல்லின் Background னை மாற்றி அமைத்து கொள்ள முடியும்.

முதலில் Page Layout tab மெனுவை தேர்வு செய்து Background என்னும் பொத்தானை அழுத்தவும்.


தேர்வு செய்தவுடன் Sheet Background என்னும் விண்டோ தேன்றும் அதில் உங்களுக்கு விருப்பமான படத்தினை தேர்வு செய்யவும்.


இப்போது எக்சலின் Background மாற்றப்பட்டு இருக்கும்.
A.Settu

விண்டோஸ் 7-ல் Logon Scren யை மாற்றுவது எப்படி?

Desktop ல் Right Click செய்து தோன்றும் விண்டோவில் Logon Screen என்பதை தேர்ந்தெடுக்கவும்.


பின் தோன்றும் விண்டோவில் Browse பொத்தானை அழுத்தி கணினியில் சேமித்து வைக்கப்பட்டுள்ள படத்தை தேர்வு செய்து Apply செய்யவும்

Monday, October 3, 2011

கீழ வீதி திருமண மண்டபம் திறப்புவிழா


A.Settu

முகவரிகளை கண்டறிய - ஒரு தளம்

எவ்வளவோ இணையதளங்கள் இருப்பினும், ஒரிரு தளம் மட்டுமே பரவலாக தெரியும். குறிப்பாக Google, Yahoo போன்றவை, இந்த தளங்களை விட சிறப்பான தளங்கள் இருப்பினும் அவை வெளியே தெரிவதில்லை. இதுபோன்ற தளங்களின் ஒன்றுதான் Indiatrace.com இந்த தளத்தின் மூலம் நாம் பல்வேறு வித வசதிகளை பெற முடியும் உதாரணமாக மொபைல் நம்பர் Trace-ல் தொடங்கி  பின் கோடு, IP அட்ரஸ் வரை நீண்டுகொண்டே செல்கிறது இந்த தளத்தின் வசதி, மேலும் நாம் தேடும் பல முகவரிகளை இந்த ஒரே தளத்தில் இருந்தப்படியே பெற முடியும். வேறு வேறு தளத்திற்கு செல்ல வேண்டிய அவசியமில்லை.


தளத்தின் முகவரி: Indiatrace


இந்த தளத்தில் இருந்தப்டியே நாம் மொபைல் ட்ராகிங்கில் தொடங்கி ஐபி, லேன்ட்லைன், பின் கோடு, STD கோடு, SMS சென்டர் வரை பல முகவரிகளை நம்மால் பெற முடியும். இந்த தளத்தின் உதவியுடன் இந்தியாவின் எந்த ஒரு முகவரியையும் (போன், ஐபி) எளிதாக பெற முடியும்.ஆன்லைனில் இருந்தப்படியே நீங்கள் மற்றவர்களின்  முகவரிகளை பெற இந்த தளம் மிகவும் பயனுள்ளதாக இருக்கும். அனேகமான முகவரியை பெறாவிட்டாலும் ஒரளவிற்கு குறிப்பிட்ட அளவு நீங்கள் மற்றவர்களின் முகவரியை அறிந்து கொள்ள இந்ததளம் வழிவகை செய்கிறது.

Saturday, October 1, 2011

விண்டோஸ் 7 ல் Run Command யை Start மெனுவில் இடம்பெற செய்வது எப்படி?

Run Command யை Start மெனுக்கு கொண்டு வர Windows7
Start மெனுவில் Right click செய்து Properties யை தேர்தெடுக்கவும்.
படம் 1 யை பார்க்கவும்.

படம்-1

வரும் விண்டோவில் StartMenu டேபை கிளிக் செயவும்.
அதில் Customize பட்டனை அழுத்தவும். படம் 2 யை பார்க்கவும்.

படம்-2

Run Command என்ற செக்பாக்சில் டிக் செய்யவும்.
படம் 3 யை பார்க்கவும்.

படம்-3

Start மெனு பட்டையில் Run Command தோன்றுவதை படம் 4 ல்
பார்க்கலாம்.

படம்-4
 
X Gangs

MS-WORD-ல் PASSWORD கொடுத்து SAVE செய்வது எப்படி?


WORD DOCUMENT-யை புதிதாக OPEN செய்து கொள்ளவும், பிறகு WORD-ல்TYPE செய்யவும். படம் 1-யை பார்க்கவும் .


படம்-1


பிறகு SAVE செய்யும்.படம் 2-யை பார்க்கவும்.
 
படம்-2


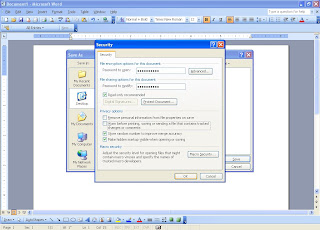
TOOLS->SECURITY OPTIONS யை கிளிக் செய்யவும். படம் 3-யை பார்க்கவும்.


படம்-3


படத்தை பெரிதாக பார்க்க படத்தின் மீது கிளிக் செய்து பார்க்கவும்.
பிறகு PASSWORD-யை என்டர் செய்யவும்.

PASSWORD-யை RETYPE செய்யவும். படம் 4-யை பார்க்கவும்.


படம்-4


பின் வேண்டிய இடத்தில் SAVE செய்து கொள்ளவும். படம் 5-யை பார்க்கவும்.


படம்-5


பிறகு WORD DOCUMENT-யை OPEN செய்யும் போது PASSWORD கேட்கும், PASSWORD-யை RETYPE செய்து OPEN செய்ய வேண்டியதுதான்.
 
A.Settu

கணிப்பொறியை முழுவதுமாக பேக்அப் எடுக்க Paragon Drive Backup 9.0

நம்முடைய கணிப்பொறியானது வைரஸ் தாக்குதலுக்கு ஆளாக நேரும், அது போன்ற நிலையில் வைரஸ்யை நீக்க முடியாமல் போகும் இதனால் நம்முடைய கணினியானது செயல் இழக்க நேரிடும் அதுபோன்ற நிலையில் நம்முடைய கணினியில் ஆப்ரேட்டிங் சிஸ்ட்டத்தை இன்ஸ்டால் செய்ய நேரிடும் அந்த நிலையில் நம்முடைய வன்தட்டில் உள்ள தகவல்களை பேக்அப் எடுக்க வேண்டிய நிலை ஏற்படும். அதுபோன்ற நிலையில் நாம் நமக்கு வேண்டிய பைல்களை தனியே தேர்வு செய்து சிடி/டிவீடி அல்லது ப்ளாஷ் ட்ரைவ்களில் பேக்அப் செய்து கொள்வோம். அவ்வாறு இல்லாமல் வன்தட்டில் குறிப்பிட்ட பார்ட்டிசியனை மட்டும் தேர்வு செய்து அதை மட்டும் பேக்அப் செய்து கொள்ள முடியும் வேண்டுமெனில் ரீஸ்டோரும் செய்து கொள்ள முடியும்.


மென்பொருளை தரவிறக்க சுட்டி


இந்த மென்பொருளை இணையத்தில் இருந்து பதிவிறக்கி நிறுவிக்கொள்ளவும், நிறுவும்போது கீ கேட்டும் அப்போது முந்தைய அப்ஷனை தேர்வு செய்து GetProductkey என்னும் ஆப்ஷனை தேர்வு செய்து ரிஜிஸ்டர் செய்தபின் உங்களுக்கான கீயானது உங்களுடைய ஈமெயிலுக்கு அனுப்பி வைக்கப்படும், பின் நீங்கள் முழுமையாக இந்த மென்பொருளை உங்களுடைய கணினியில் நிறுவிக்கொள்ள முடியும்.

மேலும் இந்த மென்பொருளின் உதவியுடன் பார்ட்டிசியனை பார்மெட் மற்றும் டெலிட் செய்து கொள்ளவும் முடியும். வேண்டுமெனில் பார்ட்டிசியன்களை மறைத்து வைத்து கொள்ளவும் முடியும். இந்த மென்பொருளானது NTFS (v1.2, v3.0, v3.1), FAT16, FAT32, Linux Ext2FS, Linux Ext3FS, Linux Swap, HPFS ஆகிய பைல் சிஸ்ட்டங்களை சப்போர்ட் செய்யும். 

விண்டோஸ் ஆப்ரேட்டிங் சிஸ்ட்டமான Xp,Vista,7 போன்றவற்றை ஆதரிக்க கூடியது ஆகும். பேக்அப் செய்ய கூடிய டேட்டாவினை ப்ளாஷ் ட்ரைவில் தொடங்கி சிடி/டிவிடிக்களில் பதிவு செய்துகொள்ள முடியும். இந்த மென்பொருள் USB 2.0 வினை சப்போர்ட் செய்யக்கூடிய வகையில் உள்ளது என்பது கூடுதல் சிறப்பம்சம் ஆகும்.

டேட்டாவினை பேக்அப் செய்ய முதலில் Backup என்னும் பட்டியை தேர்வு செய்து Next பொத்தானை அழுத்தவும், பின் எந்த ட்ரைவ் என்பதை தேர்வு செய்யவும், பின் டேட்டாவினை எந்த ட்ரைவில் பதிய வேண்டுமோ அதனை தேர்வு செய்யவும், அடுத்ததாக Finish என்ற பட்டனை அழுத்தவும். கடைசியாக Apply பட்டனை அழுத்தவும். தற்போது பேக்அப் ப்ராசஸ் நடைபெறும் , சிறிது நேரத்தில் முற்றுபெறும். பின் நீங்கள் பேக்அப் செய்த டேட்டாவினை தனியே சேமித்து வைத்துக்கொள்ள முடியும். இதே போல்தான் ரீஸ்டோரும் செய்ய வேண்டும்.